| Printable Version | PREV | NEXT |
Non-geometry nodes are entities which preform special tasks within the SLIDE environment. These nodes can be instanced and positioned just like any other node, but they do not contribute any visible geometry to renderings of the scene.
The camera statement defines a virtual camera that can be used to view a part of the SLIDE virtual world. The camera should be thought of as a system of lenses for projecting the 3D virtual to 2D within a physical camera and not as a physical camera that is oriented in a world. This virtual camera is defined within a canonical coordinate system which can then be positioned in the virtual world using the instancing and transformation mechanisms which are used for all objects in the world.
| SLIDE Definition | tclinit Definition | ||||||||||
|---|---|---|---|---|---|---|---|---|---|---|---|
|
|
||||||||||
| SLIDE Defaults | tclinit Defaults | ||||||||||
|---|---|---|---|---|---|---|---|---|---|---|---|
|
|
||||||||||

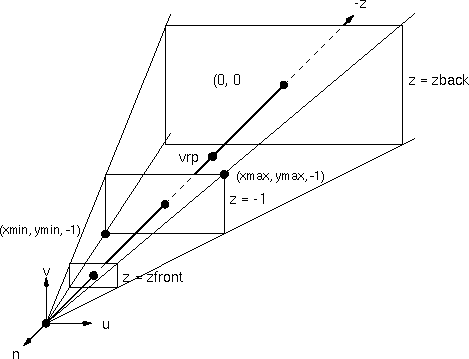
The virtual camera is defined within its local canonical view reference coordinate system (VRC). The direction of projection (DOP) always passes through the origin of the VRC. This means that the center of projection (COP), also known as the eye point, is located at the origin for perspective projection cameras. The camera points down the negative z-axis. The projection plane is defined parallel to the xy-plane at z=-1. The projection plane is defined here by convention as a convenient reference for describing the projection, and it could be place at any distance without affecting the projection.
| Field | Description |
|---|---|
| projection |
Either Perspective cameras model the behavior of ideal pinhole cameras. These cameras are used to model the functionality of the human eye situated a finite distance from the point of interest. Parallel projection cameras model a viewer an infinite distance from the objects of the scene. Parallel projections can be useful technical modeling interfaces. |
| frustum |
The min_triple and max_triple define the geometry of the viewing volume. This is the volume of the virtual world which will be rendered into the resulting image. The x and y components of the min and max triples define a rectangular window on the projection plane at z = -1. If this window is not centered on the z-axis then the projection will be oblique. The viewing volume is defined differently for perspective and parallel projection cameras. For a perspective camera the viewing volume can be constructed by shooting rays from the origin, the COP, through the four corners of the projection plane window. This forms a double pyramid, one in front of the eye and one behind the eye. For a parallel camera on the other hand, the viewing volume is constructed by first computing the DOP which is the vector from the origin to the center of the projection plane window. Then the volume is constructed by shooting four rays parallel to the DOP through the corners of the projection plane window. These four lines then bound a prismatic volume of space. This construction follows from the definition that a parallel projection is a perspective projection seen by a viewer which is an infinite distance from the scene. The perspective pyramid volume becomes this prismatic if the COP is translated along the DOP to infinity in the positive z direction. For both perspective and parallel projections, the planes z = zmin and z = zmax define the back and front clipping planes respectively that truncate the infinite pyramid or prism into a bounded viewing volume. For a perspective projection both zmin and zmax must be negative so that they are in front of the eye point. |
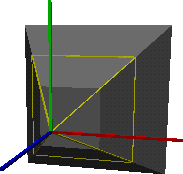
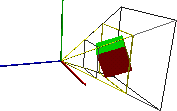
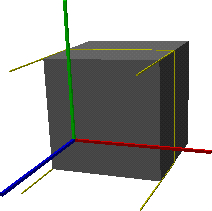
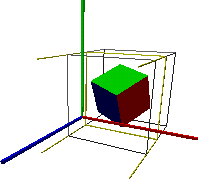
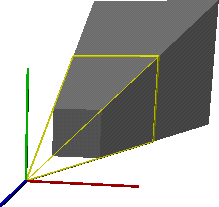
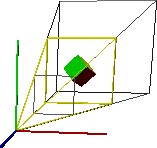
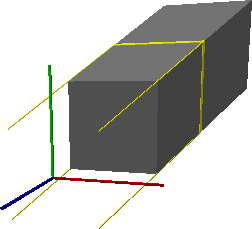
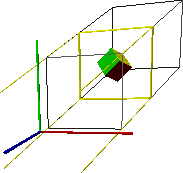
In the examples below, the positive (x, y, z) coordinate axes of the VRC are represented by the (red, green, blue) line segments respectively. The projection plane window on the z = -1 plane is represented by the yellow rectangle. The portion of the infinite viewing volume for -1 <= z <= 0 is represented by the for yellow line segments eminating from the four corners of the projection window. The grey volume is the finite viewing volume. Only the portions of objects which lie inside this volume will contribute to the final rendered image.
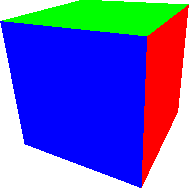
An orthogonal perspective camera is useful for modeling the way a cyclops views the world. This is also how most real life cameras work, and coincidently how most 3D applications are designed. A camera has an orthogonal projection if the direction of projection (DOP) lies along the same direction that the camera looking, i.e. the negative z-axis of the camera's local coordinate system. Another way to describe this relationship is that the projection plane window must be centered around the z-axis.
 |
 |
 |
| Static SLIDE | Procedural SLIDE |
|---|---|
# Orthogonal Perspective Camera

camera camOrthoPer
  projection SLF_PERSPECTIVE
  frustum ( -0.5 -0.5 -1.5 )
          (  0.5  0.5 -0.5 )
endcamera
|
# Orthogonal Perspective Camera
tclinit {
  slide camera camOrthoPer \
    projection SLF_PERSPECTIVE \
    frustum { -0.5 -0.5 -1.5 } \
            {  0.5  0.5 -0.5 }
}
|
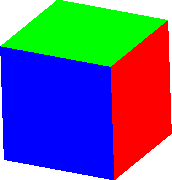
An orthogonal parallel camera is useful for technical or engineering drawings. With such a projection, parallel lines remain parallel, angles are not in general preserved, and distances can be measured along each principal axis in general with different scale factors. The frustum of such a camera must be defined such that the projection window is centered around the z-axis so that the viewer is located an infinite distance along the DOP at (0, 0, infinity).
 |
 |
 |
| Static SLIDE | Procedural SLIDE |
|---|---|
# Orthogonal Parallel Camera

camera camOrthoPar
  projection SLF_PARALLEL
  frustum ( -0.5 -0.5 -1.5 )
          (  0.5  0.5 -0.5 )
endcamera
|
# Orthogonal Parallel Camera
tclinit {
  slide camera camOrthoPar \
    projection SLF_PARALLEL \
    frustum { -0.5 -0.5 -1.5 } \
            {  0.5  0.5 -0.5 }
}
|
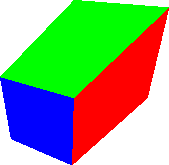
An oblique perspective camera is different from the previous perspective example in the fact that the projection window is not centered around the z-axis. In this example, the window has been moved up and to the right. Objects viewed through this camera will appear more distorted. Photographers sometimes use oblique cameras for photographing sky scrapers which is what makes the straight building appear to bend. Oblique cameras are also useful for creating stereographic images. A system of two oblique cameras can be offset from each other to model the two human eyes within the virtual world. The arrangement of two cameras with a single projection planes is equivalent to the real world situation of a person viewing a flat computer monitor with their two eyes.
 |
 |
 |
| Static SLIDE | Procedural SLIDE |
|---|---|
# Oblique Perspective Camera

camera camObliquePer
  projection SLF_PERSPECTIVE
  frustum ( 0.3 0.3 -1.5 )
          ( 1.2 1.2 -0.5 )
endcamera
|
# Oblique Perspective Camera
tclinit {
  slide camera camObliquePer \
    projection SLF_PERSPECTIVE \
    frustum { 0.3 0.3 -1.5 } \
            { 1.2 1.2 -0.5 }
}
|
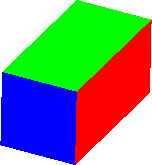
An oblique parallel camera is different from the previous parallel example in the fact that the projection window is not centered around the z-axis. In this example, the window has been moved up and to the right. Objects viewed through this camera will appear more distorted. Oblique parallel projections are sometimes used in technical drawings to provide a more 3D feel without doing a perspective projection.
 |
 |
 |
| Static SLIDE | Procedural SLIDE |
|---|---|
# Oblique Parallel Camera

camera camObliquePar
  projection SLF_PARALLEL
  frustum ( 0.3 0.3 -1.5 )
          ( 1.2 1.2 -0.5 )
endcamera
|
# Oblique Parallel Camera
tclinit {
  slide camera camObliquePar \
    projection SLF_PARALLEL \
    frustum { 0.3 0.3 -1.5 } \
            { 1.2 1.2 -0.5 }
}
|
The
projection_flag can be either
SLF_PERSPECTIVE or SLF_PARALLEL.
The default location of a global camera is at the origin, looking down the -z-axis, with the y-axis pointing up. A camera can be positioned globally or within a scene hierarchy with the instance statement.
The frustum field defines the viewing frustum against which the entire scene is clipped. Only the portion of the scene that overlaps the frustum is rendered on the image.

The frustum parameters min_triple and max_triple are interpreted as (xmin, ymin, zback) and (xmax, ymax, zfront) respectively. (xmin, ymin) and (xmax, ymax) represent the lower-left and upper-right corners respectively of a rectangle on a plane parallel to the image plane and at a unit distance from the center of projection. The view volume is the region bounded by the projections of the 4 corners of the rectangle through the COP. In the case of a perspective projection, this volume is pyramidal in shape, while it is a rectangular prism in the case of a parallel projection. The zfront and zback distances respectively define the front and rear extents of the view volume, thereby specifying a frustum.
These two values (zfront and zback) describe distances measured from the center of projection in the direction towards the VRP (i.e. the -n direction). For a perspective camera, they should both be negative values. Also, since they are measured along -n, we have zfront > zback , which is why zfront belongs in the max_triple and zback belongs in the min_triple.
If xmin != -xmax
or ymin != -ymax, then the projection is oblique.
For example,
camera narrow_angle_camera
  projection SLF_PERSPECTIVE
  frustum    (-0.1 -0.1 -100) (0.1 0.1 -0.01)
endcamera
defines a camera with identifier
narrow_angle_camera that
uses a narrow perspective projection (a zoom lens).
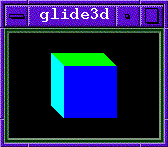 As another example,
camera oblique_camera
  projection SLF_PARALLEL
  frustum    (-0.25 -0.75 -10) (0.75 0.25 10)
endcamera
defines a camera that uses a slightly oblique parallel projection. The magnitude of the shear in the projection is determined by the midpoint of the x and y ranges - in this case the direction of projection is
(0.25 -0.25 -1).
If this camera were viewing an axially aligned cube, you would see the
top and left side of the cube.
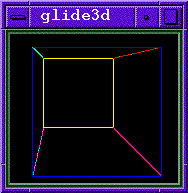
camera oblique_camera
  projection SLF_PERSPECTIVE
  frustum    (-0.25 -0.75 -10) (0.75 0.25 10)
endcamera
defines a camera that uses a slightly oblique perspective projection. The direction of projection,
(0.25 -0.25 -1), affects
the location of the vanishing point for lines parallel to the
-z-axis.
The default values for a camera statement are:
| camera | id projection SLF_PARALLELfrustum (-1 -1 -100) (1 1 -0.01)
|
| endcamera |
The projection_flag chooses the projection type of the
camera.
The default value is SLF_PARALLEL.
The projection_flag can have the following values:
SLF_PERSPECTIVE |
Perspective projection. | |
SLF_PARALLEL |
Orthographic parallel projection. |
Projections are easily calculated for a camera located at the origin and pointing down a principal axis as a simple division, in the case of a perspective projection, or dropping one value, in the case of a parallel projection. However, the positions and principal viewing directions of a camera can be arbitrarily defined in the World Coordinate System and, in general, are not in a canonical position. Rather than performing the projection in World coordinates, it is easier to first transform the objects into a new coordinate system in which the camera is canonically positioned, and then perform the projection in this coordinate system.
This new coordinate system for the camera is called the View Reference Coordinate System (VRCS). Its principal axes are called the u, v and n axes. The camera is at the origin of the VRCS, looking down the -n-axis, with the v-axis pointing up.
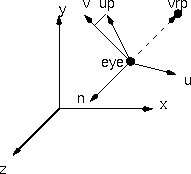
The lookat transform defines two points, eye and target, and one vector up. These three parameters fully specify the VRCS.
The eye defines the Center of Projection (COP) in a perspective projection. It is the location of the camera in the Object Coordinate System. In a parallel projection, the actual COP is at infinity, and the eye value is used to calculate the direction of projection. The eye is the origin of the VRCS.
DOP = target - eye
The target defines the View Reference Point (VRP) in Object coordinates. This is the point on which the camera is fixated; the center of attention. The COP and the VRP define the View Plane, or image plane. The View Plane passes through the VRP and its normal, the View Plane Normal (VPN), is defined by the vector from the VRP to the COP.
VPN = eye - target
In the case of a parallel projection, the direction of projection is a vector along the direction from the COP to the VRP. Since the parallel projections in SLIDE are orthographic and not oblique, the VPN is always opposite to the direction of projection.
The up vector defines the View Up Vector, VUV in World coordinates. Its projection onto the view plane defines the up direction of the projected image.
The VRCS is a right-handed coordinate system and is fully specified by the above three parameters. The origin of the VRCS is the COP. The VPN (the unit vector from the VRP to the COP) is the n axis. The cross product of the View Up Vector with the n axis gives the u axis, and the cross product of the n axis with the u axis gives the v axis.
 |
 |
 |
The camera statement is used to define
the view volume that defines the portion of the world to be viewed.
The projection_flag defines the type of projection made by
the camera.
Its value can be either SLF_PARALLEL to represent a
parallel projection, or SLF_PERSPECTIVE to
represent a perspective projection.
This flag specifies how the 3D objects should be transformed onto the
2D image plane.
The projection of a 3D point onto an image plane is the intersection with the image plane of the ray emanating from the eye and passing through the point in question. In a perspective projection, the Center of Projection (COP) is at the eye and is hence at a finite distance from the image plane. Perspective projection produces the variable foreshortening effect that we encounter in our daily experiences, and is therefore often used where visual realism is desired.
In a parallel projection, the COP is assumed to be at infinity and therefore the rays (or projectors) are all parallel to each other. In this case we talk about the Direction of Projection (DOP). Parallelism of lines is preserved and there is constant foreshortening such that, in general, distances along principal axes can be measured. If the x and y values of the frustum are not symmetric about the z-axis (2D origin), the DOP will not be parallel to the view plane normal (VPN) and the projection will be oblique.
| SLIDE Definition | tclinit Definition | ||||||||||
|---|---|---|---|---|---|---|---|---|---|---|---|
|
|
||||||||||
| SLIDE Defaults | tclinit Defaults | ||||||||||
|---|---|---|---|---|---|---|---|---|---|---|---|
|
|
||||||||||
The light statement defines a type of light that can be positioned within a scene with a light instance statement, and used to illuminate the faces of all objects within the scene.
The type of the light source is specified by the lighttype_flag that can be SLF_AMBIENT, SLF_DIRECTIONAL, SLF_POINT or SLF_SPOT. The effects of these different lights is described with the SLIDE lighting model
The default location of a global light is at the origin, looking
down the -z-axis.
A light can be positioned globally or within a scene hierarchy with
the light instance statement.
Translation will only affect lights with position information,
i.e. lights of the type SLF_POINT or SLF_SPOT.
Rotation will only affect lights with directional information,
i.e. lights of the type SLF_DIRECTIONAL or SLF_SPOT.
The color_triple defines the RGB components (between 0 and 1) of the color of a light.
The deaddistance_float defines the dead distance for the attenuation with distance. This term is used to prevent numerical instabilities in the lighting calculation when a light is extremely close to a surface.
The falloff_float defines the exponent for the attenuation with distance. These two terms are relevant only for point and spot lights.
The angularfalloff_float defines the exponent for the angular falloff between the principal direction of a spot light and the vector from the spot light to the point being illuminated.
The lighttype_flag chooses the type of a light source.
The default value is SLF_AMBIENT.
The lighttype_flag can have the following
values:
SLF_AMBIENT |
Ambient light affects a surface regardless of geometry. | |
SLF_DIRECTIONAL |
A directional light is located at infinity and does not attenuate with distance, but shines in a given direction. | |
SLF_POINT |
A point light is located at a finite position and radiates light equally in all directions. Its light is attenuated with distance. | |
SLF_SPOT |
A spot light is also located at a finite position, but its light is radiated along a principal direction. Its light is attenuated with distance and falls off with angle away from its principle direction. |
The shading_flag determines which surface color is applied to each vertex during rendering and how that color is used to calculate lighting for the face.
SLF_WIRE: Lighting is disabled, use the
face's surface's color to color all of the vertices, as described in
Surface Specification section.
SLF_FLAT:
One lighting color value should be applied to all vertices of
the face. This single lighting value should be calculated at
the approximate center of the face using the face
normal.
SLF_GOURAUD:
This shading model is used to approximate smooth curved
objects with polyhedral models.
A lighting color value should be calculated for each vertex of
the face using the vertex normal and the
vertex color.
Color should then be linearly interpolated across the face.
SLF_PHONG:
This is a different shading scheme to approximate smooth
curved objects with polyhedral models.
A separate lighting color value should be calculated for each
pixel used to fill the face.
Each vertex has a normal vector and a surface color.
The normal vector is linear interpolated across the face using
incremental rotations for each pixel.
The surface color is linearly interpolated across the face.
Lighting is computed for each pixel using the current
interpolated normal vector, the interpolated surface color,
and the 3D position of the point on the face that corresponds
to the current pixel.
SLF_INHERIT, then the
surface property for the current face should be used at that vertex.
If a smooth shading scheme (such as Gouraud shading) is being used,
this will have the visual effect of a smooth surface with
discontinuties in surface color.
In smooth shading models, the lighting for a vertex should be computed using a normal vector that has been calculated or specified for that vertex. If no normal is specified in the associated point statement, then a normal should be calculated by taking a weighted average of the normals of all faces that reference the point in their untransformed object space. The weight applied to each face normal should be proportional to the angle in the plane of the face made by the two edges incident to the point.
This section explains the way in which the various lighting parameters are used to characterize the illumination of the scene.
The lighting model is used to calculate the the color of every point on a surface under illumination. It is defined to be the sum of the illuminations from each individual light source.
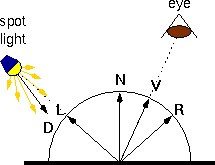
The following symbols are used in all the lighting calculations below:
Note: L, V, N, and R are all unit vectors
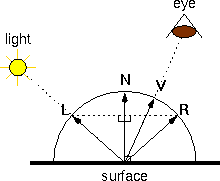
The illumination at a point on a surface is dependent on both the properties of the surface and those of the illuminating light sources. The parameters of the surface statement define the various surface properties.
| surface | id color (Cr Cg Cb) reflectivity (Kamb Kdiff Kspec) exponent Nphong metallic m |
| endsurface |
The (Cr Cg Cb) triple specifies the diffuse color of the surface - i.e. the color of the surface when viewed under diffuse illumination or the normal color of the surface. This is Cdiff.
Kamb, Kdiff, and Kspec are the ambient, diffuse, and specular reflection coefficients respectively. All should be between 0 and 1. Each is multiplied by the three color values of the surface to provide the reflectance properties of the surface for each of the three colors. The Kamb coeffiecient controls the fraction of ambient light that is reflected from the surface. This coefficient can be raised or lowered to match the general reflectivity of the surface (i.e. Kamb = Kdiff) or to represent the amount of ambient light that affects the object (i.e. the ambient light coefficient may be lowered if the object is believed to be in a dark corner of the scene.) The Kdiff coeffiecient controls the fraction of light that is reflected diffusely from the surface. This diffuse reflection is calculated with Lambert's law. The Kspec coeffiecient controls the fraction of light that is reflected specularly from the surface. This specular reflection is calculated according to the Phong illumination model.
Nphong is the exponent in Phong's specular term.
Lighting calculations should be performed in the light's coordinate system. The point being lit and its normal vector should be transformed to the light's coordinate system using Qlight<-object and Qobject<-lightT respectively. This will enable correct calculations for falloff in the case of a light that has been scaled and will allow for spotlights or point lights to be nonuniformly scaled in the world.
m is the metallic factor of the surface and is used to calculate Cspec, the specular color of the surface. The value of m should be between 0 and 1. The more metallic a surface is, the more of its natural color is reflected in specular reflections. If a surface is purely metallic (m=1) then specular reflections off the surface will have the same color as diffuse reflections; if a surface is purely plastic (m=0) then specular reflections will be exactly the color of the incoming light. If Clight is the color of the illuminating light, then
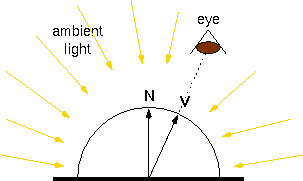
light  id
  type  SLF_AMBIENT
  color (Cr Cg Cb)
endlight
An ambient light defines non-directional background illumination. The color of a surface illuminated by ambient light is
For example:
light bg
  type  SLF_AMBIENT
  color (0.86 0.2 0)
endlight
defines a reddish background illumination.
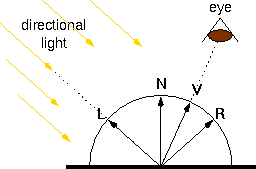
light  id
  type  SLF_DIRECTIONAL
  color (Cr Cg Cb)
endlight
A directional light is a light source at infinity with light being
radiated in one principal direction,
D = (xd yd zd).
By default that direction is (0 0 -1),
along the -z-axis,
but it can be changed by the transformations that place the light in
the scene.
If Qworld<-light is the light's transformation
then
Similarly, the surface and its normal could be transformed to the
light's coordinate system using
Qlight<-world and
Qworld<-lightT respectively.
Then the default light vector, (0 0 -1), is
used.
This method will give correct results in the case of a scaled light
source.
For a directional light, the normalized light vector, L, is constant for all points under consideration.
The color of a point on a surface illuminated by a directional light source is
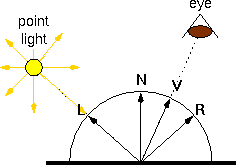
light  id
  type         SLF_POINT
  color        (Cr Cg Cb)
  deaddistance (d0)
  falloff      (n1)
endlight
A point light source is located at a point
P = (xp yp zp),
and radiates light equally in all directions.
By default that position is at the origin, (0 0 0),
but it can be changed by the transformations that place the light in
the scene.
If Qworld<-light is the light's transformation
then
is the position of the light source in world coordinates.
Similarly, the surface and its normal could be transformed to the
light's coordinate system using
Qlight<-world and
Qworld<-lightT respectively.
Then the default light position, (0 0 0), is
used.
This method will give correct results in the case of a scaled light
source.
The light vector, L, is different for each point on the surface and is the vector from the point under consideration to the light source. d0 is the dead distance and n1 is the exponent in the falloff factor.
The color of a point on a surface illuminated by a point light source is the same as for a directional light source except that it is attenuated with distance by a factor 1/(d0 + d)n1. If d is the distance from the light source to the point under consideration, the color of a point on a surface illuminated by a point light source is:
light  id
  type           SLF_SPOT
  color          (Cr Cg Cb)
  deaddistance   (d0)
  falloff        (n1)
  angularfalloff (n2)
endlight
A spot light source is located at a point P = (xp yp zp), but like a directional light source, it radiates light in one principal direction. D = (xd yd zd) is the vector in the principal direction of the radiated light. By default the spot light source is positioned at the origin,
(0 0 0), looking down the -z-axis,
(0 0 -1). These can be changed by the
transformations that place the light in the scene just as for
the
point light
and the
directional light
respectively.
The light vector, L, is different for each point on the surface and is the unit vector from the point under consideration to P. d is the distance from the light source to the point. d0 and n1 are the same as for a point light and n2 is the exponent of the angular falloff between D and -L. The color of a point on a surface illuminated by a spot light source is the same as for a point light source except that it is attenuated with angle out of the beam by a factor [D . (-L)]n2. The color of a point on a surface illuminated by a spotlight is
| PREV | NEXT |