 Under construction ...
ANIM2D --
A simple Polygon Editor for Floor Outlines in UniGrafix Format
anim2d is a modified verison of the animator
UniGrafix visualization and editing tool that is restricted to produce polygons
on a gridded x-y-plane. Here are the instructions how to use this tool:
- This program runs on SGIs only.
- To start the program type "anim2d"; -- it takes no arguments.
- TO USE THE MENU- MAKE SURE THAT THE MOUSE GETS OUTSIDE OF THE MENU WINDOW
AT LEAST ONE TIME ON START UP!!!
- The right mouse button is used to drag down individual menus.
- There is a reference grid displayed by default that goes from (0,0) to
(100,100) with 10X10 blocks. It can be changed with the Grid Options menu.
- CREATING VERTICES AND FACES:
- To create a vertex, place the mouse cursor in the desired location and
double click with the left mouse button. You should see the new vertex
highlighted in yellow.
- If you already have a face, and double click on an edge, the vertex will
be added on the edge. (This only works, if the Select Edges option is kept
turned on in the Options Menu under the Selection Options submenu.)
- If you already have a face, and double click on the interior of the face,
the vertex will be added on the face.
- To select an existing vertex, use a single click with the left mouse button.
- Holding the shift key while selecting, allows multiple selections.
To create a face, select the desired vertices in counterclockwise order and
then either hit F2 or "Create Face" from the "Edit" menu.
- HINT: You can save some work if you create the vertices in the correct order
for the face while holding down the shift key; they will all remain selected,
and you can just hit the F2-key without having to selct them explicitly.
- Delete items by selecting them and then hitting the "Delete" key.
- To move vertices, select the desired vertices (1 or more) and then
move them all by holding down the right mouse button. If Snap to Grid is selected,
then each vertex individually will snap to the nearest Snap-Grid location.
- ALL VERTEX CREATIONS AND MOVES WILL BE COERCED TO AN INTEGER COORDINATE.
(On moves it wont happen until you release the mouse button)
- The Z-coordinate is always set to zero.
- CHANGING THE VIEW:
- To zoom the view, hold down the middle mouse button and shift key.
- To translate the view, hold down the middle mouse button and control key.
- SAVING/LOADING FILES:
- Go to the "File" menu.
- USING THE GRID:
- Go to the "Grid" menu and select "Grid Options".
- You can turn the grid on and off with the first toggle button.
- You can specify that all vertex moves and creations be snapped to the
grid with the second toggle button.
- There are two grids: one that is displayed, and one that is snapped to.
They are mutually registered to one another at the origin.
- Displayed blocks and invisible grids are square.
- You may enter the grid block size and the min and max bounds
of the displayed grid interactively.
If you type in something invalid, the program will try to do the "right" thing,
but the input box will not display the new value;
(for example, if you enter a block size of less than 1, a value of 1.0 will be used).
- The "Grid Snap Size" applies when "Snap to Grid" is activated. If it is set
to 5, vertices when created or moved will snap to the closest grid points --
which are spaced at 5 unit intervals.
- EXIT
- Go to the "File" menu
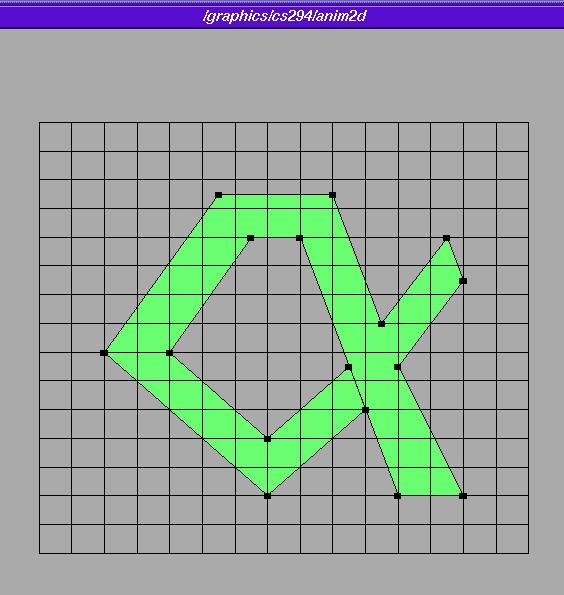
The working space of animator with a layout
of a floorplan in the shape of the letter ALPHA.
Note the single contour
produced by inserting a small crack:

This is how the grid-options were set for this task:

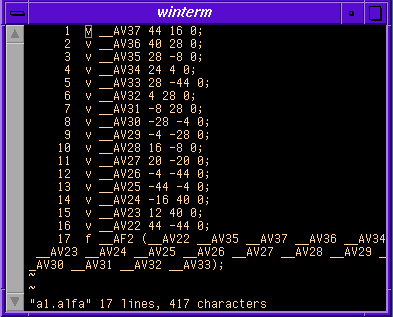
And this is the resulting UniGrafix file.
Note that all vertex coordinates are integer multiples of 4:

<-- Back to CS 294-5 HomePage
Page Editor:
Carlo H. Séquin


