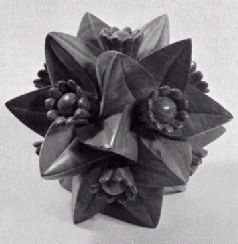
Starting with the basic generator file escher_ball.slf. First aim to understand the logic and mechanics in this file. Then, in the same spirit, enhance the file to make an interesting/intricate object with oriented icosi-dodecahedral symmetry (without the bilateral mirror planes). Note that this is not a legal solid shape. It has superposed two surfaces: the polyhedral zone composed of 2 yellow and 2 blue triangles, as well as the pink bilinear Bezier patch. To be legal you would only use one or the other -- but I wanted you to see an example of both, and in your design it is OK to mix these primitives side by side.
As a first step add a couple of extra points on the rim of the basic quadrilateral zone. Make sure that each such point is generated with a repeated copy properly rotated with respect to one of the axial symmetry centers, so that the rims of the 60 copies of the fundamental zone coincide when the copies are placed with the icosidodecaheadral instance generator.
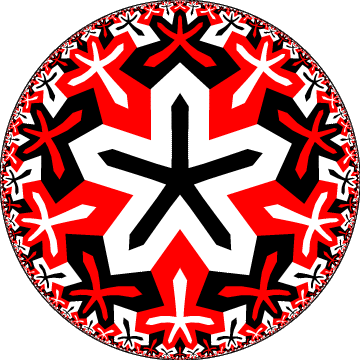
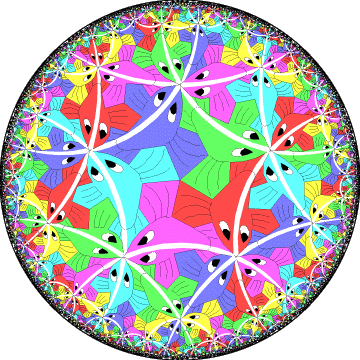
Once you understand this principle, you can add more points -- on the rim as well as inside -- and make a really interesting shape such as these cross shapes or fish shapes by Douglas Dunham.
Of course not every point needs to be given three sliders ! Use them sparingly. For instance, you may want to keep all rim points on the surface of the unit sphere if you want to achieve some kind of tiling look rather than that of a flower with a distinctly radial structure. It may also be worthwhile to design the zone-tile separately with any graphical editing tool and then convert it into a SLIDE description of the points, faces, and/or patches. These you then cut and paste into your .slf-file, perhaps with no sliders at all.
Harlan Hile has written a cute polyline editor to output SLIDE points, and, very graciously, has made this editor available to everybody !
Once you have a pleasing looking design with some good 3-D structuring to the surface, you should try to output STL without creating any errors based on unmatched edges. This should then be a single water-tight surface of genus zero. Slice it with QuickSlice to make sure everything is OK.
Bring one printout to class for show and discussion.
Hand in one printout with the full address of your solution directory for my records and collection.
Thus you can construct three arbitrary polylines between the symmetry axis points (A2,A3) and (A3,A5) and (A5,A2). If you keep all the intermediary point at distance 1 from the center of the ball, you will get a nice wire-mesh ball after application of the 60-fold symmetry generator provided. This should readily allow you to make an interesting interlocking pattern on the sphere first (you may even connect all intermediary points to two sliders each (phy, theta) and then really play with different shapes to your hearts delight ... Once these boundaries are determined, you can then add internal points and connect them with triangles to the boundary.
Alternatively, rather than drafting your geometry with the wire mesh described above, you could make a warped face corresponding to, say, the yellow part in the fundamental region. When replicating this 60 times, you will see a partially perforated Escher ball, which again may be a good way to design, visualize, and debug the outline boundaries of the basic tile. The second tile set would simply corresponding to the missing part in the sphere surface, and can be constructed after you have finalized the outlines of the first one.
RE Fabrication,
Chris Spitzer had this suggestion
>>Regarding the recent class discussions of how to fabricate a hollow sphere
- we've only talked about fabrication of the object as a whole. Why not
build the top and bottom separately, then glue the two halves together? It
seems as if that takes care of many of the support problems, and would
allow objects like Harlan created (or I attempted to) to be freed more
easily. It would also use less support material.
--
This is right on ! I have used this to build a "Recursive Spiral Surface" model.
Thus when you are all done with your Escher Ball design, include a large sphere to save as much material as possible without making the wall thinner than 60 mils at any point. (Aim for an outer ball diameter between 2.5 and 3 inches.) Then, when you have sliced your ball, discard the bottom half of the contour set; move the remaining set to Z=0; make a copy of the set and place it next to the first one. Now calculate the supports, add a base, and save as SSL. Then run the roads to check that everything is ok. If you are short of disk space, you need not save SML; I have typically grabed your designs in the SSL form, so that I can combine two of them if appropriate.