Overview
The purpose of this homework is to understand image morphing better by doing
it yourself! It is also to have lots of fun playing with morphing yourself
into another person.
To begin, choose a new partner and go to 111 Cory
While in class, choose a new partner (you haven't had before) so that one
of you knows how to use a Macintosh and one of you doesn't. Walk into 111
Cory (our Multimedia lab) together and sit down in front of a Macintosh.
Each of you is going to do your own morph, but you should help each other
in case questions arise.
Doing the morph (is this like doing the 'Macarena'?)
 While sitting in front of the mac, turn it on. (upper
right button on the keyboard)
- Double-click on the
User Storage folder.
 Double-click the folder called
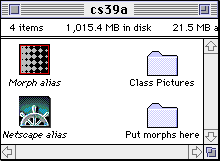
 cs39a, you'll
see this:
 Double-click the
 Netscape alias
icon, then find this URL, which is http://www.cs.berkeley.edu/~ddgarcia/cs39a/hw4/
 Double-click the
 Morph alias icon (this
starts the Morph program)
- The program boots and starts with two windows like this:

 The tall skinny one
on the left is the
 Tool palette and the cool-looking one on
the right is the storyboard window.
- Double-click the left black window (called a
thumbnail)
in the storyboard window. This will bring up the "Choose
a file to open" dialog box. You are now going to find your photo.
- Successively click on:
Desktop button (this brings you to the top of the file
system)
User Storage folder
cs39a (class directory)
Class Pictures (where the photos are)
YourfirstnameYourLastName.jpg (it will ask you to convert and save the image as YourfirstnameYourLastName.jpg Picture - Just keep hitting Ok to save the picture into the local directory.
- Do the same thing for the right window to choose the person you will
morph into. This morph order is printed here, so choose the person whose
name appears below yours:
- LancelotBeare (LB)
- BrianBarsky (BB)
- Brian Chan (BC)
- Alvin Moy (AM)
- Ryan Osborn (RO)
- Greg Mercer (GM)
- John Burton (JB)
- Westley Sarokin (WS)
- HP Duiker (HP)
- Corey Creasey (CC)
- James Pine (PI)
- Felix Chu (FC)
- Eugene Kim (EK)
- James Park (PA)
- Keren Albala (KA)
- Liz Saura (LI)
- Lei Shen (LE)
- Young Park (YP)
- Cynthia Cheung (CY)
- Sabrina Ham (SH)
- DanGarcia (DG)
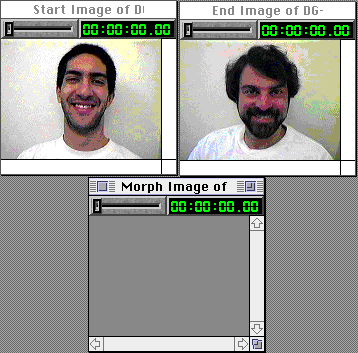
 Your window should now look like
this, with your picture in the left thumbnail and the person you'll morph
into in the right window.
- Click on both thumbnails and put the windows that come up side-by-side.
- For each window, click on the lower part of the "5" in the upper-right counter until until it reads "1".

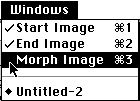
 Select
 Windows->Morph Image
from the menu
 Put that morph window centered beneath
both images, like this.
 Change the time of the window to .50 using the
slider.
 Select Sequence->Morph from the
menu
 You should see results like this.
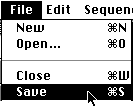
 Select
 File->Save to save your
morph document to the folder: "Put morphs here" as
the name:
YOUR_INITIALS->THEIR_INITIALS morph, for
example in the Dan Garcia (DG) morphing into Brian Barsky (BB) case the
file would look like:
DG->BB morph
Any region you see that doesn't seem to align and seems half-faded is
the result of a poor morph due to bad registration. You need to register
your images. First go down to Sproul Hall and pick up a registration form
(no, just kidding). Registering two images is the process of telling the
computer where similar features exist in each. For example, the nose might
be a few pixels to the left in one image, or one image may be smiling and
the other image isn't. To create a good morph, you need to tell the system
about all of these inconsistencies.

 When you are done placing your registration marks,
you are ready to make your movie. Select
 Export Movie... from the File menu.
- Put your movie in the folder "
Put morphs here"
as a Quicktime file named:
YOUR_INITIALS->THEIR_INITIALS.mov, for
example in the Dan Garcia (DG) morphing into Brian Barsky (BB) case the
file would look like:
DG->BB.mov
 Make sure the settings look like
this dialog box, 10fps, Medium quality and Video Color compressor.
- You can select File->Open to look at your movie.
WWW Maven: Dan Garcia (ddgarcia@cs.berkeley.edu)  Send me feedback


 While sitting in front of the mac, turn it on. (upper
right button on the keyboard)
 The tall skinny one
on the left is the
  Your window should now look like
this, with your picture in the left thumbnail and the person you'll morph
into in the right window.

 Select
  Put that morph window centered beneath
both images, like this.
 Change the time of the window to .50 using the
slider.
 You should see results like this.
 Select
 When you are done placing your registration marks,
you are ready to make your movie. Select
  Make sure the settings look like
this dialog box, 10fps, Medium quality and Video Color compressor.