1. Establish a WiFi Connection
The code snipped below connects the MCU to a WiFi access point:
import network, time

wlan = network.WLAN(network.STA_IF)      (1)
wlan.active(True)
if wlan.isconnected():                   (2)
    print("No WiFi Connection")
    # code to handle the problem ...
print("Connecting to Wifi ... ")
wlan.connect('SSID', 'password', 5000)   (3)

for _ in range(100):                     (4)
    if wlan.isconnected():
        print("Connected to WiFi!")
        break
    time.sleep_ms(100)
if not wlan.isconnected():               (5)
    print("Unable to connect to WiFi")
wlan.disconnect() (6)| 1 | Configure as WiFi client. Some implementations also support configuration as WiFi access point. |
| 2 | Don’t wait if connection is already established. |
| 3 | Attempt connection. Supply the correct SSID and password of the WiFi access point you are connecting to. |
| 4 | Wait for connection to be established or give up on failure after 3 seconds. |
| 5 | Print error message if connection failed. |
| 6 | Free up resources if connection failed. |
Upon successful connection, the IoT device receives an internet address from the DHCP server (part of the access point/router it is connected to). Use the following statement to print out this address:
print("IP", wlan.ifconfig()[0])prints the IP address, e.g. 192.168.1.78. This value depends on the network and can be different each time the device connects.
| Many applications (e.g. the examples below) require the MCU to be connected to the internet to function. If your program is not working as expected or throwing an exception, verify that it is connected to the Internet, e.g. by checking the IP address and fetching the current time (see below). |
Needing a wired connection to learn the IP address of a device is not always a practical solution. Alternatives are (1) using a relay with known public address (e.g. MQTT broker) or (2) mDNS, a feature that “broadcasts” a user-friendly name on the local network, also known as Bonjour.
Advertise microcontroller as my_esp32.local on the local WiFi subnet.
hostname = "my_esp32"
print("start mDNS server, hostname", hostname)
mdns = network.mDNS(wlan)
mdns.start(hostname, "MicroPython REPL")
mdns.addService('_repl', '_tcp', 23, hostname)
Once the microcontroller is connected, optionally set the on-board clock to the correct date and time with the code in Example 2.
Micropython maintains an internal clock that needs to be initialized to the correct date and time. This can be accomplished by fetching those from the internet using the code shown below:
import machine

rtc = machine.RTC()
rtc.ntp_sync(server="pool.ntp.org")
for _ in range(100):
    if rtc.synced(): break
    time.sleep_ms(100)
if rtc.synced():
    print(time.strftime("%c", time.localtime()))
else:
    print("Unable to get ntp time")
This uses the Network Time Protocol (NTP).
With WiFi activated, the microcontroller can be programmed over the web. To enable this feature, follow the instructions in Example 3.
Start the telnet (REPL) server on port 22.
user = "my-user-name"
pwd  = "my-top-secret-password"
network.telnet.start(user=user, password=pwd)| The user name and password are transmitted without encryption and therefore provide almost no security. Use this only behind a firewall! |
With the telnet server started, connect to the Micropython REPL from a host computer with
telnet <ip>where <ip is the internet address of the microcontroller. You will be asked the username and password specified above. Programs such as shell49 also support wireless connections. See the documentation for the connect command.
2. Communication Protocols
Micropython network support implements network sockets, a programming interface for communicating over the internet that is the basis for implementing higher level protocols such as http or MQTT.
2.1. MQTT
MQTT relies on a broker to forward messages between clients. With this arrangement, clients only need to know how to reach the broker, not other clients. Consequently only the broker needs to have a public IP address.
Figure 1 shows a conceptual diagram of an MQTT network with three clients. One client, a temperature sensor, publishes measurement results. The other two clients subscribe to this “feed” and get notified each time the “temperature client” sends out a new result. Additional clients, both sensors and subscribers, can subscribe and disconnect at any time, and all clients can be simultaneously publishers, subscribers, or both.
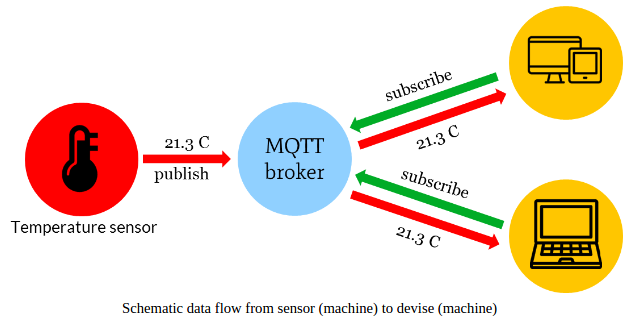
MQTT messages consist of a “topic” and a “payload”. The topic is a descriptive name of the data being sent, e.g. “temperature”. Forward slashes can be used for organization, e.g. “office/temperature” or “bedroom/temperature”. The payload is the actual message.
Many MQTT brokers are available on the internet. Some are public (e.g. iot.eclipse.org or test.mosquitto.org) while others are offered by cloud service providers including Amazon AWS, Google, IBM Watson or Microsoft Azure. Public brokers are convenient for testing, but since they offer absolutely no security and are somewhat unreliable, commercial brokers are preferred. Alternatively a broker can be run on personal hardware, such as a laptop or a Raspberry Pi (e.g. open source MQTT broker).
What makes MQTT particularly attractive for MCUs is the simple protocol and minimum overhead sent with each message. This contrasts with the verbosity of HTTP. Since in sensor applications communication frequently dominates power dissipation, MQTT is especially well suited for battery powered applications. There are many large scale applications of MQTT, e.g. Facebook Messenger.
Open-source code implementing MQTT clients is available in many programming languages. There is also a client for MicroPython. Tools for testing are available also.
2.1.1. Application Template
The code below consists of two parts. The first program (mcu.py) runs on an MCU and publishes data. The second program (host.py) is for a host computer (e.g. laptop) and subscribes to the data. print statements throughout the code are for testing and can be removed once verification is complete.
# mcu.py

from mqttclient import MQTTClient
import network

# Important: change the line below to a unique string.
session = "unique_id_must_match_host_session"
BROKER = "iot.eclipse.org"

# check wifi connection
wlan = network.WLAN(network.STA_IF)
wlan.active(True)
ip = wlan.ifconfig()[0]
if ip == '0.0.0.0':
    print("no wifi connection")
    # code to handle the problem ...
else:
    print("connected to WiFi at IP", ip)

# connect to MQTT broker
print("Connecting to MQTT broker", BROKER, "...", end="")
mqtt = MQTTClient(BROKER)
print("Connected!")

# send data
# In this sample, we send "fake" data. Replace this code to send useful data,
# e.g. measurement results.
for t in range(100):
    s = sin(t/10)
    # add additional values as required by application
    topic = "{}/data".format(session)
    data = "{},{}".format(t, s)
    print("send topic='{}' data='{}'".format(topic, data))
    mqtt.publish(topic, data)

# do the plotting (on host)
print("tell host to do the plotting ...")
mqtt.publish("{}/plot".format(session), "create the plot")

# free up resources
# alternatively reset the microphyton board before executing this program again
mqtt.disconnect()
If you get an IndexError in line 65 of mqttclient.py, MQTT cannot find the broker. This usually occurs when (1) the MCU is not connected to WiFi, or (2) the WiFi network it is connected to cannot reach the server (e.g. if it’s just a local WLAN without Internet access), or (3) the broker does not exist or is currently off-line.
|
Before running the host code, make sure that the mqtt client and pyplot are installed. Run the following statements from a command prompt on the host computer (this step is only required once):
pip install paho-mqtt
pip install matplotlib
MQTT client code running on the host:
# host.py
import paho.mqtt.client as paho
import matplotlib.pyplot as plt

# Important: change the line below to a unique string,
# e.g. your name & make corresponding change in mqtt_plot_mpy.py
session = "unique_id_must_match_host_session"
BROKER = "iot.eclipse.org"
qos = 0

# connect to MQTT broker
print("Connecting to MQTT broker", BROKER, "...", end="")
mqtt = paho.Client()
mqtt.connect(BROKER, 1883)
print("Connected!")

# initialize data vectors
# in this example we plot only 1 value, add more as needed
t = []
s = []

# mqtt callbacks
def data(c, u, message):
    # extract data from MQTT message
    msg = message.payload.decode('ascii')
    # convert to vector of floats
    f = [ float(x) for x in msg.split(',') ]
    print("received", f)
    # append to data vectors, add more as needed
    t.append(f[0])
    s.append(f[1])

def plot(client, userdata, message):
    # customize this to match your data
    print("plotting ...")
    plt.plot(t, s, 'rs')
    plt.xlabel('Time')
    plt.ylabel('Sinusoid')
    print("show plot ...")
    # show plot on screen
    plt.show()

# subscribe to topics
data_topic = "{}/data".format(session, qos)
plot_topic = "{}/plot".format(session, qos)
mqtt.subscribe(data_topic)
mqtt.subscribe(plot_topic)
mqtt.message_callback_add(data_topic, data)
mqtt.message_callback_add(plot_topic, plot)

# wait for MQTT messages
# this function never returns
print("waiting for data ...")
mqtt.loop_forever()
Now start host.py on the host computer and then run mcu.py on the MCU.
2.1.2. AdafruitIO and IFTTT
Adafruit IO is an MQTT broker that saves and plots data received and also interfaces to other services. Here we show how to use it to send and SMS via IFTTT.
-
Create an account on Adafruit IO and IFTTT
-
Create a feed on Adafruit IO, e.g.
sms-feed -
On IFTTT, create a new applet (menu at top right). For
thisuseAdafruit(monitor feed based on Adafruit IO, selectsms-feed, and choose a condition, e.g. greater than 100), forthatuse SMS, click on the action and edit the message to your liking. -
Run the following code on the microcontroller:
from mqttclient import MQTTClient
from time import sleep

server = "io.adafruit.com"
# update with your values from AdafruitIO ...
aio_user = "your aio user name"
aio_key = "your aio key"

mqtt = MQTTClient(server=server, user=aio_user, password=aio_key, ssl=True)

# send SMS
mqtt.publish("{}/feeds/sms-feed".format(aio_user), "200")
Similarly, choosing Adafruit as the then action sends information from IFTTT back to AdafruitIO and the MQTT client on the microcontroller:
def mqtt_callback(topic, msg):
    print("mqtt got topic={}, msg={}".format(topic, msg))

mqtt.set_callback(mqtt_callback)
# create feed in AdafruitIO and set up Applet in IFTTT to send data ...
mqtt.subscribe("{}/feeds/ifttt-info".format(aio_user))

# listen for mqtt messages
for i in range(1000):
    mqtt.check_msg()
    sleep(1)
2.2. HTTP
HTTP is used by web browsers to fetch data from servers. Typically webpages are for human consumption with lots of graphics and other information that is difficult for machines (such as a small MCU) to parse and decipher. However, the protocol can also be used to transmit data in machine readable formats.
2.2.1. Application Examples
The examples below show how to get the current weather (Example 4), send an SMS (Example 5) and serve a simple webpage ([webserver]) from the microcontroller. Similar techniques are used to connect to a wide range of other resources.
In addition to human readable forms, many weather forecasts are also available in machine readable form. This example shows how to access the forecast from Wunderground.
First create an account at https://www.wunderground.com/weather/api and take note of the api key and http url example.
Then use the following template to access current weather conditions:
import urequests as requests                          (1)

res = requests.get(
"http://api.wunderground.com/api/1d7486ee37eb4276/conditions/q/CA/San_Francisco.json")
                                                      (2)

print(res.json()['current_observation'], end='\n\n')  (3)

weather = res.json()['current_observation']
print("Temperature", weather['temp_f'], "F")          (4)
print("Temperature", weather['temp_c'], "C")
print("Weather ", weather['weather'])| 1 | Import the python request library. Micropython calls it urequests to alert to the fact that only a subset of the full functionality is implemented. |
| 2 | URL and api key you got from wunderground |
| 3 | Print complete dict of current conditions, formatted as json for readability. |
| 4 | A few interesting values |
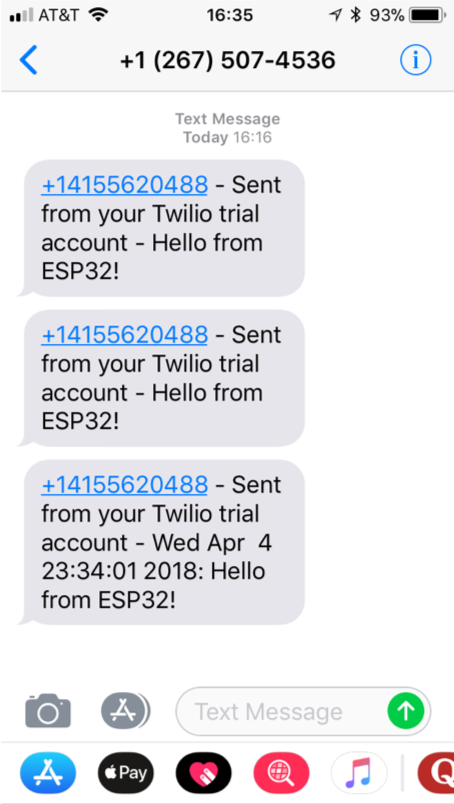
Even microcontrollers without a cellular modem can send text messages using services on available the internet.
This example shows how to use twilio for this purpose.
-
Twilio requires base64 encoding, which is not available by default in Micropython. Grab it from https://github.com/micropython/micropython-lib/blob/master/base64/base64.py and copy to the microcontroller.
-
Create an account at https://www.twilio.com.
-
Get a twilio phone number (from the
usagetab). -
Take note of
auth_sidandauth_tokenand copy to the code template below.
import urequests as requests
from base64 import b64encode     (1)
import time

# Credentials                    (2)
auth_sid    = "AC84e26324d90473624d90476324d9047"
auth_token  = "ba0ad421bd69da0b5f041a74d"
to_number   = "+15105523503"
from_number = "+14155770289"

# sample message                 (3)
msg = "{}: Hello from the MCU!".format(time.strftime('%c'))

data = "To={}&From={}&Body={}".format(to_number, from_number, msg)

def auth(user, pwd):             (4)
    """Twilio uses basic authentication"""
    return (b64encode(
                b':'.join((auth_sid.encode('latin1'),
                           auth_token.encode('latin1'))))
           ).decode('ascii')

response = requests.post(
    url="https://api.twilio.com/2010-04-01/Accounts/{}/Messages".format(auth_sid),
    data=data,
    headers={
        'Authorization': 'Basic {}'.format(auth(auth_sid, auth_token)),
        'Content-Type': 'application/x-www-form-urlencoded',
    },
)                                (5)

# print success/error messages
print()
print("response.text =", response.text)| 1 | Import the base64 library you downloaded. |
| 2 | Update this section with the values you obtained from twilio and the phone number you want to send an SMS to. |
| 3 | Compose a message. The sample simply sends the current time and Hello. Be creative. |
| 4 | This function is used to encode the auth_sid and auth_token in base64 format, as required by twilio. |
| 5 | Http post request instructing twilio to send the SMS on behalf of the microcontroller. |
2.2.2. Webserver
Webservers for large internet sites use racks (or warehouses) full of powerful computers. But the minimum code for a server is actually quite simple and can run on a small microcontroller. This said, these platforms are in most cases not the best choices for this task.
The code below runs a webserver on the microcontroller that serves a single page with two buttons to turn an LED on or off.
Access the server from a browser by typing http://aaa.bbb.ccc.ddd into the search bar. aaa.bbb.ccc.ddd is the IP address of the microcontroller.
from machine import Pin
from board import LED
import socket
import time

html_response = """<!DOCTYPE html>
<html>
  <head><title>MCU LED ON/OFF</title></head>
  <body>
    <h2>MicroPython Web Server</h2>
    <form>                                               (1)
      LED:
      <button name="LED" value="ON"  type="submit">LED ON</button>
      <button name="LED" value="OFF" type="submit">LED OFF</button>
    </form>
    <br/>
    {}
  </body>
</html>
"""

led = Pin(LED, Pin.OUT)

s = socket.socket(socket.AF_INET, socket.SOCK_STREAM)    (2)
s.bind(('', 80))                                         (3)
s.listen(3)                                              (4)

while True:
    print("Waiting for connection ...")                  (5)
    conn, addr = s.accept()                              (6)
    print("Got a connection from %s" % str(addr))
    request = conn.recv(1024)                            (7)
    print("Content = %s" % str(request))
    request = str(request)
    if 'GET /?LED=ON' in request:                        (8)
        print('Turn led on')
        led(1)
    if 'GET /?LED=OFF' in request:
        print('Turn lef off')
        led(0)
    t = time.strftime("%c", time.localtime())
    conn.send(html_response.format(t))                   (9)
conn.close() (10)| 1 | HTML defining two buttons to turn LED on or off. |
| 2 | Create a socket for the webserver to accept connections on. |
| 3 | Configure the socket to listen on port 80, the standard internet port for http. |
| 4 | Maximum number of unaccepted connections before refusing new connections. Choose a small value to not overload the microcontroller. Google uses a more powerful computer to handle search requests and presumably a larger number for listen. |
| 5 | Debug messages. Remove those once everything is working. |
| 6 | Wait for web browser to connect. |
| 7 | Fetch data sent by browser in response to clicking the LED ON/OFF buttons. |
| 8 | Turn the LED on or off as requested by the user. Here we use very simple code to extract this data from the request. Real webservers use more sophisticated parsers. |
| 9 | Send the html response with updated current date and time. |
| 10 | Close the connection (also a socket) to recycle resources and loop back to wait for a new request. |
There are many other things to try: blink an LED based on button push on smart phone (install IFTTT app), get SMS or email on the MCU, turn on the coffee maker from the MCU, react to voice commands given to Amazon Alexa, smartphone apps, etc.