Now we are ready for sophisticated projects. Building on the previous two labs, we are implementing a robot that balances on two wheels, like a Segway. A a core is a PID controller that uses both motors to keep the robot from falling over.
1. Prelab
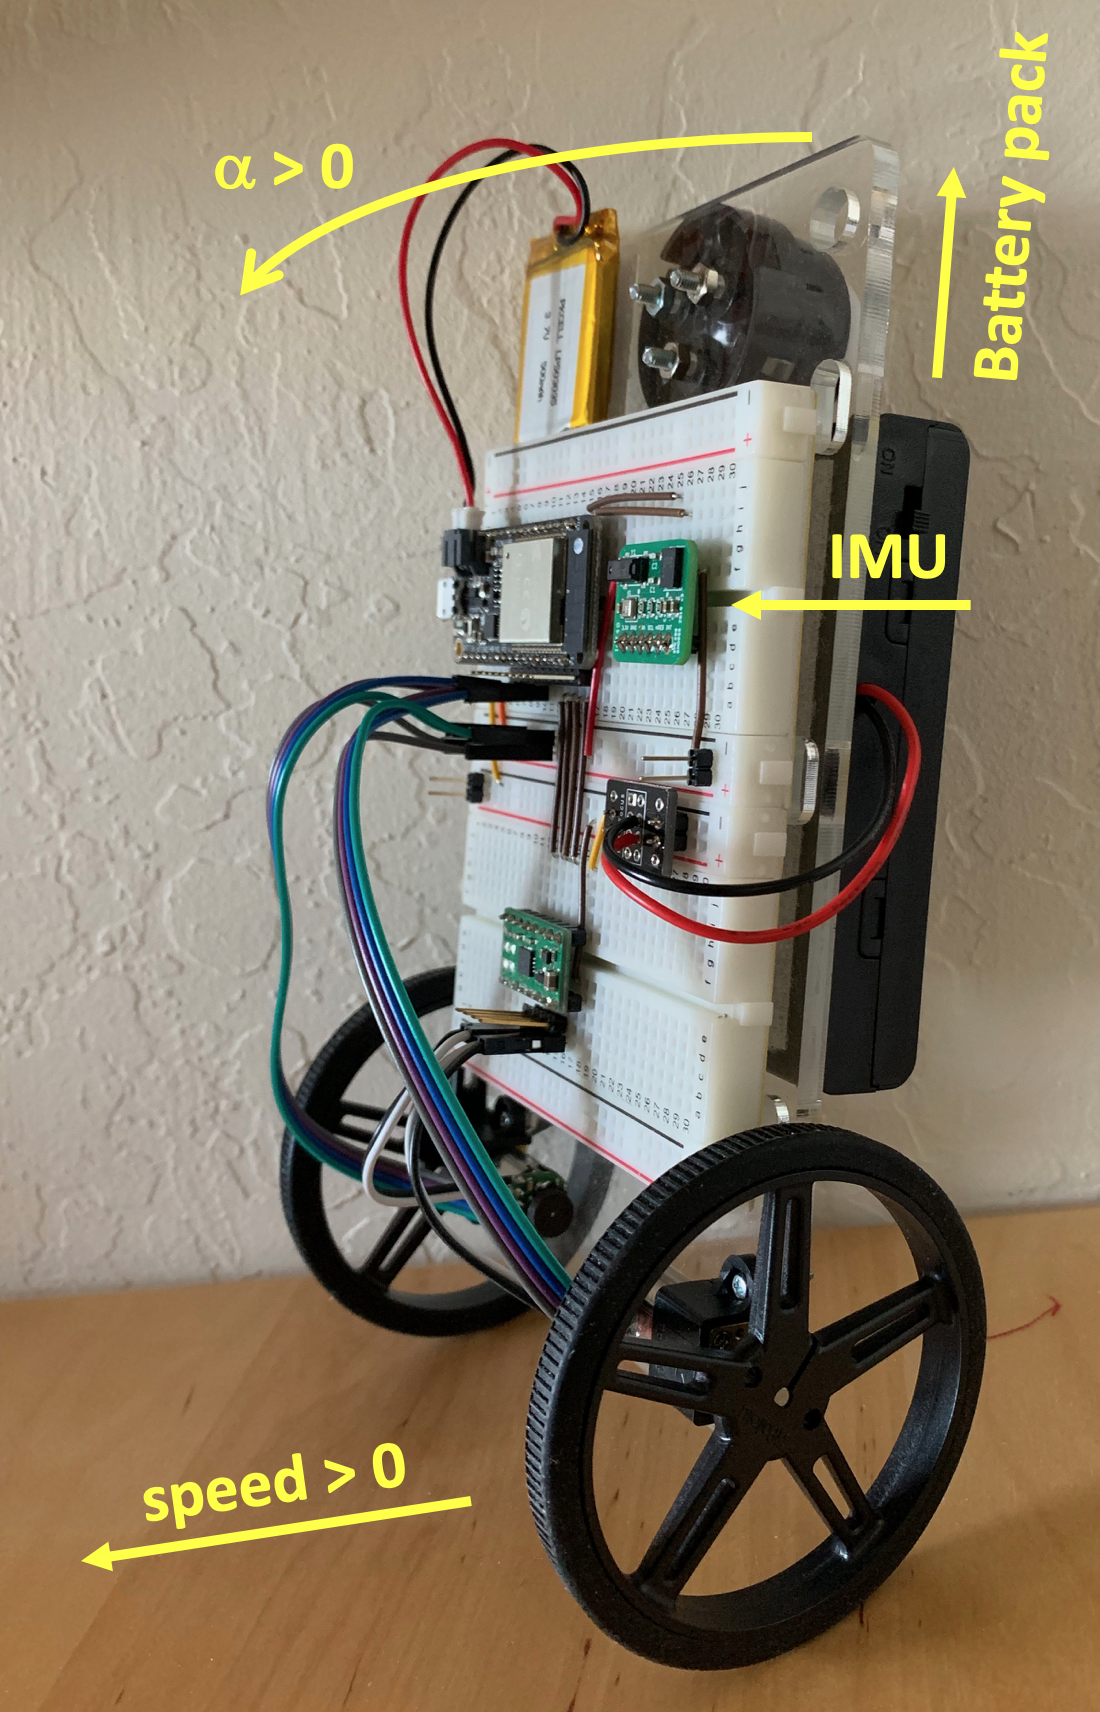
1.1. Prepare Robot for Balancing
Let’s prepare the robot for balancing on two wheels. You may make the changes now or in the lab, but read the instructions now. Figure 1 illustrates the steps:
-
Install the IMU (BNO055). It’s the same sensor used in an earlier lab that also contains the air quality sensor (BME680). Be sure to use the same orientation as shown in the picture (pins on the side towards the bottom of the robot). Only power and I2C connections are needed.
If you get I2C bus errors, do a soft reset (pressing the reset button) or completely remove power from the circuit and reapply it. The connection is quite finicky and you want the shortest possible wires between the BNO055 and the ESP32 to reduce stray capacitance and prevent interference from the wires moving about.
-
Remove the castor wheel and move the battery pack up to be flush with the upper edge of the mounting plate. The higher center of gravity lowers the resonant frequency.
-
Verify that positive values for
speedsupplied to the DRV8833 driver propel the robot (both wheels) in the direction indicated by the arrow. -
Verify that
vertical.py(see below) outputs values for \(\alpha\) consistent with the arrow in Figure 1. \(\alpha=0\) when the robot is standing up vertical.
1.2. IMU
To balance, the robot needs to know when it’s upright. This is accomplished with an Inertial Measurement Unit (IMU). Typical IMUs consist of three accelerometers and three angular rate sensors (gyroscopes) to measure linear acceleration and angular rate around the x, y, and z-axis. Many also include three magnetometers to detect earth and other magnetic fields to provide additional information that may be useful for navigation.
From this data it is possible to compute the direction in which we, or rather a robot, is going, or if it is standing up. For example, the z-axis (depending on the direction the IMU is mounted on the robot the relevant axis may be different) accelerometer will measure exactly 1g (9.8 m/s2) when the robot is standing up, and a smaller acceleration as it is turning over. Once it is horizontal, the detected acceleration is zero (and another accelerometer is measuring 1g).
The IMU we are using in the lab, the BNO055. Download the MicroPython driver (bno055.py and functools.py) from the github repo and study the example provided. In addition to temperature and euler, the also has member functions accelerometer, magnetometer, gyroscope (as well as a few others, check the code).
Change the code that instantiates the I2C driver from the example for the ESP32 and set the I2C communication frequency to 12.5kHz (an incompatibility between the BNO055 and the ESP32 prevents operation at a higher speed).
Then write a program that uses the accelerometers in the BNO055 to compute the angle \(\alpha\) (pitch) of the robot with respect to vertical (see Figure 1 for the definition of \(\alpha\)). For comparison, also print out the Euler pitch angle computed by the IMU.
Save your file as vertical.py and upload to the MCU and gradescope.
1.3. Balancing Code
The code for balancing the robot uses the same controller concepts, as well as the IMU, DRV8833, and encoders. At the core are PID controllers to set the speeds of both motors, and an additional PID controller for balancing.
From the github repo download the python code (balance.py etc.). Rename main.py to main_test.py for testing. Check out the code, especially main.py.
The code provided uses your versions of drv8833.py, encoder.py, and motor_controller.py with the following modifications:
-
drv8833.py: no changes needed -
encoder.py: add a method to clear the decoder count:class Encoder: # keep all existing code and add a method to clear the encoder count: def clear_count(self): # modify to match the variable names used in your code: # self.dec.clear() pass -
motor_controller.py:-
rename to file
motor.py -
rename class name
MotorControllertoPIDMotor
-
Upload all files to the MCU and gradescope.
2. Lab
2.1. IMU
First check out that the IMU is functioning properly. Print out the x/y/z accelerations and angular rates in an infinite loop. Then hold up the robot and turn it in various directions. Do the measured outputs agree with your expectations? This link gives an idea of what’s possible.
Now using the code developed in the prelab, plot the angle calculated from z-axis acceleration (vertical axis) versus the Euler angle computed by the BNO055 engine (horizontal axis) as you slowly turn the robot on its wheels from horizontal to vertical and back to horizontal on the opposite side.
Ideally, the output is a straight line (why?).
Checkoff:
2.2. Balance
Fire up the balancing code, turn the robot vertical and let go when you feel the controller to take over (it is programmed to detect and start automatically when it’s near vertical).
For your first tests, keep the USB connection to the MCU and manually start main_test.py. Carefully tilt the robot up and verify that it tries to balance. One all is as expected, rename main_test.py to main.py and remove the USB cable. Power the MCU from the LiPo battery (make sure it’s charged). Reset the MCU and enjoy your robot standing all by itself!
No Champagne in the lab ☹, but you are welcome to a glass of water and HUGE PRIDE 😁!
Checkoff:
Feel free to modify the robot and add features. Can you make it turn while keeping balance? Move forward and back? Dance? What about remote control? Combining what you have learned in EE49 the possibilities are endless.
2.3. Next Steps
The opportunities for IoT and combinations of mechanics with electronics do not end here. As you learn more about engineering in other classes, you will find ever new opportunities for clever, useful, and maybe even groundbreaking innovations that leverage the capabilities of this incredible field. Send me a card (email or MQTT are fine, too) when your invention hits the shelves (or an online retailer)!